Simply Living Journal

Food & Garden

Erika Sedgman

A plan for simple backyard permaculture

The average house block can be transformed into a wonderful, productive and convenient food oasis using permaculture principles in the design process. Permaculture systems aim to maximise the benefits of various elements in the garden to reduce cost, labour, pollution and waste by creating convenient and interacting zones.

Permaculture plan

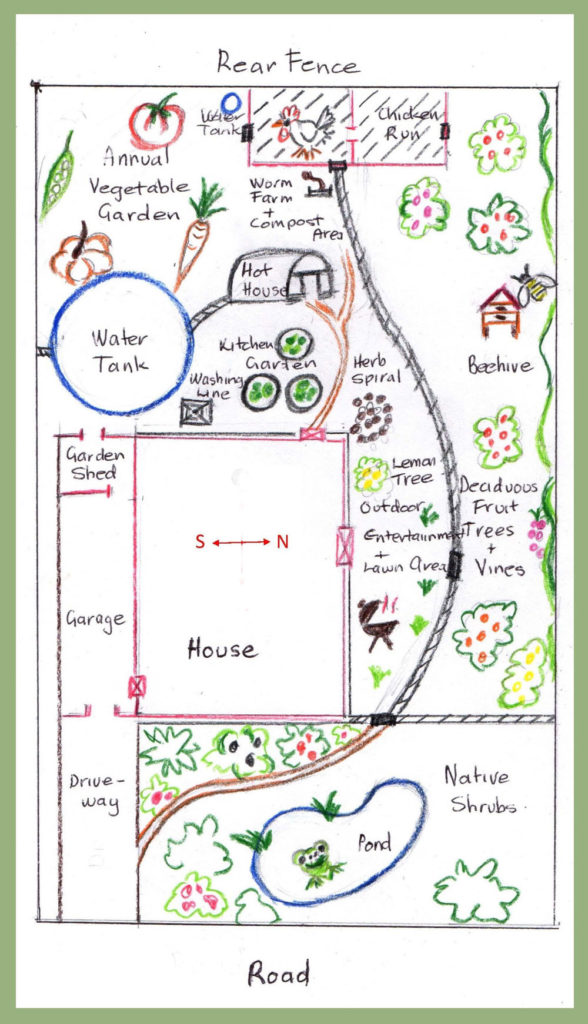
The first zone, which is generally outside the back door of the home, contains the most frequently required and visited areas i.e. the lemon trees, the herb garden, the kitchen greens garden and the hothouse. The annual crop garden and orchard need less attention so they can be placed in a zone further away from the back door.

If chickens are included, then placing them between the orchard and the vegetable garden allows them to have easy access to both when they are required to clean up after cropping or to consume fallen fruit and bugs in the orchard. Connecting a small water tank to the hen house roof and plumbing it to their water supply saves time spent dragging water to them.

The compost area and worm farm has been conveniently placed close to the vegetable garden and the hen house. The hen house is generally visited twice a day (in the early morning and evening) so the worms can be fed and items can be dropped in the compost on the way. A more labour efficient way to compost could be incorporating it into the chook yard and letting the hens who scratch for a living, turn it over while adding their own fertiliser.

Deciduous fruit trees and vines have been placed on the northern side of the yard because in summer they provide shade and during winter they let in sunlight. Bee hives have been placed in the orchard because as well as proving honey, bees are also invaluable as a pollinating agent. The hives can be owned by the householder or leased and serviced by a local beekeeper. This usually involves a fee but also includes a share of the bounty.

Lawn areas are costly, labour intensive and non-productive so reducing these areas, keeping only what is required for recreational purposes and putting the rest into food production makes a lot of sense.  Generally this is part of an entertainment area in a zone close to the northern side of the house so that it’s a shady spot in summer and a lovely sunny spot during winter.

The front of the yard has been planted with natives for interest, aesthetic reasons and to attract native birds and small native animals including lizards, which are beneficial for the garden. It could also have an added pond feature to attract native frogs, helping some of our endangered species to thrive.

By Erika Sedgman
Havenhill Permaculture

https://www.facebook.com/Havenhill-Permaculture


Heather-Gillespie-Organic-Flower-Grower

Organic flower grower talks about growing peonies

Heather-Gillespie-Organic-Flower-Grower

One of my all-time favourite flowers is peonies often referred to as peony roses due to their likeness in appearance to roses yet they aren’t related. They really are however, the Queen of flowers with spectacularly beautiful, large, soft blooms that come in a range of colours from white, ivory and lemon to shades of mauve, pink, orange and red and they can be successfully grown in the home garden in cooler climates.

Peonies are often denoted as being difficult plants to grow but they are really simple to grow when you know how, and once established they require little maintenance. When you get it right, people will admire and fall in love with your peonies for years to come. They flower throughout spring and can live for more than 100 years.

The fattest and most scrumptious of all flowers, a rare fusion of fluff and majesty, the peony is now coming into bloom.
–Henry Mitchell, American writer (1923-93)

Peonies take pride of place adorning many of the amazing gardens of China and Europe and were painted by 19th century impressionist artists including Renoir.

They are native to Asia, Southern Europe and Western North America and have a history that dates back to being cultivated in China more than 4,000 years ago.

There are two types of peony plants, herbaceous peonies and tree peonies. Funnily enough tree peonies aren’t at all like trees. They are short bushes that grow to about a metre in height with stick like branches that are left after the plant has finished blooming and become dormant. Fortunately, both the tree peony and the herbaceous peony like the same conditions and environment and both produce the same extraordinarily beautiful blooms.

There are a few simple steps to successfully growing peonies:

  1. As with any plant, make sure you have the right climate to begin with. Peonies need a cooler temperature for bud formation so you will need to be living in a cooler climate. In Australia they are best grown in mountain districts, parts of Victoria and Tasmania.
  2. You will need well drained soil as peonies hate having soggy feet.  It’s easy to work out whether or not your soil is well drained. Dig a hole and if water in it takes a day or two to drain away, it’s safe to say it’s not. You can correct this with lots of compost and by raising your garden bed above the natural soil level with more compost and soil loaded with organic matter.
  3. Make sure the garden bed is in full sun. Peonies require a lot of sun to flower, unless you are in a slightly warmer climate in which case you might need to think about partial shade to protect them from the heat of the midday sun.
  4. Add loads of lime. In their natural environment peonies thrive in a lime-based soil.  So when I say lime, I mean about 2 litres of lime in the hole you plant them in and then 2 litres of lime every year. If in doubt add more lime not less.

  1. Apply some good organic fertilizer. I was once told by an older lady who was an expert peony grower to dig a hole, put in some lime and throw in a dead rat, and then plant. I laughed and wondered how many dead rats she thought I had handily laying around. Well-rotted chook poo is my favourite but cow or sheep manure is just as good. Be a bit careful with horse manure because you can get a lot of weed seed with it and it may be mixed with wood chips that take time to break down.
  2. Plant your herbaceous peony with the eyes facing upwards and about 5 centimetres below the surface. Plant your tree peony as you would any other plant. Make sure they are not competing too much with other plants.
  3. Don’t smother your herbaceous peony with too much mulch.  The beautiful herbaceous peonies find it hard to push through too much. The tree peonies however, stay above ground with dormant branches during winter and then burst into life in spring, so feel free to mulch these.
  4. Be patient.  It can take a few years to get your first flowers but I promise you the wait is worth it.

By Heather Gillespie, Organic flower grower

https://www.ridgeroadblooms.com


My grandmother’s easy scones and damper with variations

In Australia during the turn of the century, cooking was carried out using very basic ingredients. Locally produced Mutton, beef and fish were cooked with a small amount of pepper and salt and served with vegetables, herbs and fruit taken fresh from the garden.

Many families had their own chickens so eggs were plentiful and due to the many dairy farms and house cows in the town’s surrounding areas, so too were milk and butter.

Staples that were purchased, and often in bulk, were flour, tea and sugar. Flour was used in various ways to spread the meat and vegetables further. It was plain flour so yeast or cream of tartar with bicarb of soda were added as natural raising agents.

Two items that were commonly cooked were scones and damper. They were quick and easy, delicious, economical and fed many.

We discovered in our kitchen that there are so many things a cook could do with basic scone/damper dough and we have added our favourite variations.

We have kept plain flour with natural raising agents in the recipe, which can be replaced with self-raising flour. The dough needs to be put into the oven more quickly when using natural raising agents. We have also used raw sugar, which is the least processed form of cane sugar. A modern variation we’ve added is pizza base, which basic scone dough is ideal for. Cooks then didn’t have scone cutters so clean fingers were used to shape the dough.

Basic scone dough and all its variations.

SCONES / DAMPER
2 cups of plain flour (unbleached white or wholemeal)
2 level teaspoons of cream of tartar
1 level teaspoon of bicarb of soda
1 level tablespoon of butter
1 cup of milk

Sift the flour into a large bowl. Using an extra fine strainer (sometimes known as a coffee strainer) sift cream of tartar and bicarb of soda into the flour. Rub butter into the flour mixture. Pour in milk and using a metal spoon mix into soft dough. Place dough onto floured board and then flatten it out a little (gently). Cut the dough into squares with a metal knife. Make them round by shaping with your fingers, place on a greased tray and bake in a preheated oven for approx. 15-20 minutes at 180-200˚C.

VARIATIONS

FRUIT SCONES
Add 1/2 to 1 cup of dry fruit and 1 tablespoon of raw sugar to the basic dough.

DATE SCONES
Add 1/2 to 1 cup of chopped dates to the basic dough.

CHEESE AND HERB SCONES
Add ½ to 1 cup of grated cheese and chopped fresh chives to basic dough.

PUMPKIN SCONES
After rubbing butter into flour, add ¼ cup of sugar, 1 egg, 1 cup of cooked pumpkin and mix to soft dough.

DAMPER
Mix the dough with ½ cup of milk and ½ cup of water. Knead lightly once or twice on a floured board and cut 2 slits in the top. Place on a greased tray and bake approx. 30 minutes at 200˚C.

PIZZA BASE
Roll out basic scone dough, put on greased trays and top with a sauce and what you have available. Bake in preheated oven approx. 30 minutes at 200˚C.

PIN WHEELS
Roll out basic scone dough. Spread with filling or paste. Roll up like a Swiss roll and slice. Bake in preheated oven for approx. 15-20 minutes at 200˚C.

DUMPLINGS
Cut basic scone dough into squares (handle lightly) and roll into balls. Boil in sauce or place on top of casseroles or stews.

GOLDEN SYRUP DUMPLINGS
Add 1 teaspoon of vanilla and 3 tablespoons of sugar to basic scone dough and make into dumplings. SAUCE: Bring to boil 3 tablespoons of butter, 1 ½ cups of water, 2 tablespoons of golden syrup, ¼ cup (4 tablespoons) of raw sugar. Simmer dumplings in sauce mixture approx. 20 minutes.


Sweet-Betsy-at-a-market

Sweet Betsy’s journey to becoming a delightful mobile café

A few years ago, twin sisters April and Kirsty along with their close friend Lindy, embarked on a journey to follow their long-held desire to own and operate a mobile café. They found an old vintage Franklin caravan and transformed it into an adorably cute mobile café and named her ‘Sweet Betsy’.

Original-state-of-Sweet-Betsy

The three partners tow her to three markets each month and attend annual events throughout the year selling coffee, tea, spiced chais, vanilla chais, iced coffees, iced chocolate, soft drink, juices and water. To sweeten the experience they offer old-fashioned home-made muffins, cakes and slices including a few gluten free varieties. They also sell packs of baked treats and a large variety of bottled jams, pickles and chutneys to take home.

“The idea was a dream that for a long time didn’t come to fruition because I was living interstate,” Kirsty said. “After I came home, we decided to give it a go.  We put an advertisement on a buy swap and sell Facebook page and a lovely couple answered it. We found Betsy as we called her, camped out in a paddock and we towed her to our parent’s house.”

The three friends then pulled out the old furniture and April and Kirsty’s parents helped them renovate. “Mum did all the interior decorating while Dad did all the grunt work and he remodelled the servery,” April said. “Then Lindy’s wonderful cousin donated our beautiful timber bench tops.”

Kirsty-Lindy-and-April

April, Kirsty and Lindy all love to bake, which brought them together. Kirsty and Lindy met each other while working together many years ago in hospitality. Kirsty now also works at a bank, Lindy makes special occasion cakes from home and April runs her own driving school. They all grew up in the country and they now all have young families.

April said originally the dream was to have the business operating full time but they have come to the conclusion that it’s not realistic while they have young children. “Setting up a coffee van somewhere at six in the morning with young children at school logistically at this time is difficult to do. Ideally it would be a lovely goal to aim towards.”

The small business, after operating part time for one financial year, managed to cover initial expenses, which were substantial and make a profit. Among the initial capital expenses was a coffee machine costing $4000, a grinder costing another two and a large fridge. “Another expense was the learning curve,” April said. “We started from scratch without any real business plan. We didn’t know anything about setting up websites and we had no idea how to label our jars, which are inspected by the council. We didn’t know what coffee brand to use or what cups to buy. Knowing how much food to bake and bring was another big learning curve. Initially there was a lot of waste.”

Baking for the business is carried out in Lindy’s registered kitchen where they all get together and bake whenever they need to.

Sweet-Betsy-at-a-market

Lindy said their Sweet Betsy is heavy weighing around two tons. “Kirsty usually tows,” April said, “she’s the only one with a car strong enough but Lindy can borrow her parent’s Pajero and they are now really good at reversing and getting into tiny spots.”

The original affordable petrol generator they used was noisy so they have since invested in the best one on the market, one that is almost silent and moderates the power so it’s much more economical. The van also has an 80 litre water tank and a waste water storage tank making her completely self-sufficient so they can park anywhere.

“We love it, we all really enjoy it,” Kirsty said. “The events are great, we’re out interacting with people and everyone’s really nice but behind the scenes preparation while managing our time around kids and working other jobs can be challenging.”

April said what she likes the most is getting to know the other stall holders. “Most are like-minded small business owners and people who work from home that just want to get out and make their hobby more than it is. It’s a really lovely welcoming community.”

Roasted-Colonial-Goose

Enjoy your Aussie Christmas with roasted colonial goose

Colonial goose was cooked in Australia by our colonial ancestors who missed having their customary English goose for Christmas dinner. They improvised by stuffing a leg of lamb or mutton, which happened to be plentiful at the time, with traditional English goose stuffing and then roasted it.

Colonial Goose is a delicious Christmas dish when served with simple seasoned gravy made from the meat juices.

Roasted-Colonial-Goose

You will need:
Leg or shoulder of mutton or lamb (boned)
3 rashers of bacon finely chopped
1 heaped tablespoon of finely chopped fresh parsley
3 cups of fresh breadcrumbs
2 finely chopped medium onions
1 teaspoon of thyme, sage and marjoram
½ teaspoon of grated or ground nutmeg
Salt and pepper to taste
1 well beaten egg
Milk

Mix all ingredients together in a bowl except the egg and milk.

Stir in the egg and enough milk to just moisten the ingredients. Stuff the opening in the meat and tie securely with cotton string. Place in a baking pan allowing it to roast in its own fat in a moderate oven for 15-20 minutes per half kilogram. To serve cut the string.

Quick and easy gravy: Pour fat out of the pan leaving the meat juices. Place one tablespoon of plain flour in the bottom of a jar. Add pepper and salt and fill the jar with cold water. Shake with the lid on and pour the contents into the pan with the meat juices and stir constantly over the heat until it thickens. Serve hot.

The perfect apple sauce for your roast pork

Peel and core 3 medium apples and chop or thinly slice. Place in a small saucepan and half cover with cider. Cook uncovered until the cider has partially evaporated and the apple is pulpy. Remove from the heat and beat until smooth. Stir in 1 heaped teaspoon of butter. Sprinkle on some black pepper and serve hot.

Roast cooked by head chef Brad Sampson at the Noojee Hotel, Victoria

making an organic floral centrepiece

Make an organic Christmas floral table centrepiece

Our talented organic florist, Danielle Clark has put together a simple centrepiece for the Christmas table using items you may have around the house and flowers and foliage from the home garden.

You will need a large bowl and a pillar candle tall enough to keep the flame safely away from the finished arrangement. Gather foliage and flowers from the garden. Pull off any dead leaves or damaged petals and trim the pieces ready to use.

Place the candle in the middle of the bowl and create a lattice effect across the top using sticky tape.

Start with a few larger pieces of foliage and look for pieces that are even in shape. Pull the leaves off the lower part of the stems so there aren’t any under the water and arrange them in the bowl symmetrically. Danielle has used fern.

Add another layer of foliage. Danielle has used some English box.

She has then added some gum, variegated holly and a few pieces of asparagus fern. The idea is to keep building the foliage placing the stems through the spaces between the tape until you can’t see it, or see the bowl.

Add a few larger flowers arranging them symmetrically. Danielle has used red roses but there are many varieties and colours that can be used.

Then add some smaller flowers to complete the arrangement. Small pink roses, tea tree, forget-me-nots and a small native flower have been used to complete this one.

The beautiful finished centrepiece ready to place on the Christmas table.

https://www.facebook.com/NoojeeBotanicals